Dev Blog
Hi, this is the Stranded III development blog (see also Forum Thread, Comment Thread).
Entry 62 - Models & Baking - March 29, 2017
Again too much time without a dev blog entry! Sorry! Let's change that!
More Models at Sketchfab
I uploaded some more models to Sketchfab so you can see them in 3D.
I put some work in improving a few of the existing models. I made the palm tree bark texture more beautiful for instance.
Moreover I improved some bushes because the arrangement of the leaves was too boring and made them look too flat.
 Palm Tree @ Sketchfab
 Lifebuoy @ Sketchfab
 Driftwood @ Sketchfab
I also made some new plant variations. For example there are now more "curly" fern versions.
Didn't quite manage to achieve the look I actually wanted to achieve but I like it anyway:
 Curly Fern @ Sketchfab
(Sketchfab seems to have some alpha/z-sorting issues with that model)
And here are some more shrooms:
 Champignon @ Sketchfab
 Amanita Pantherina (Panther Cap) @ Sketchfab
 Amanita Muscaria (Fly Agaric) @ Sketchfab
(yes, both Aminata shrooms use the same model and I basically just re-colored the texture and changed some details. But hey, why not?)
Menus
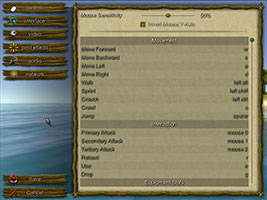
I mentioned earlier that I want to move all basic menus (like the settings menu) to the C# code base instead of using Lua for them.
This process is nearly done. So not only the UI elements are now C# but also the menus themselves.
Of course you will still be able to create custom menus in Lua and for some menus there will be ways to influence/modify them a bit.
Moreover you will always be able to add additional elements to existing menus and to add sprites and effects.
There also have been some optimizations behind the scenes.
I moved all icons used by the UI to the same sprite atlas for example. This way Unity can batch stuff more efficiently and render the menus even faster.
I also drew some new icons:
 click to enlarge
Research/Excursion: Baking
Even though Stranded III's art style doesn't imply high realism I want to be familiar with the mechanics in the game and how they would work in real life.
I'm sure that this kind of knowledge helps a lot to make better games. For Counter-Strike 2D for instance it helped me to fulfill my military service at the German Bundeswehr. That way I learned first-hand how real weapons actually work and managed to design them way more accurately in the game with details like recoil animations and muzzle smoke as well as bullet casing particles.
Therefore I decided to bake my own bread rolls. And I made pictures to document the process.
 click to enlarge
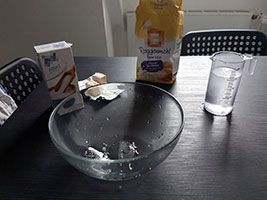
The ingredients are very simple:
 250g flour (of course I used high quality type 1150 flour!)
 150ml water
 6g salt
 21g yeast
(the recipe I used was everything of this times 2 but it was for 8 rolls and I only wanted to make 4 so I only took half of the original ingredients)
 click to enlarge
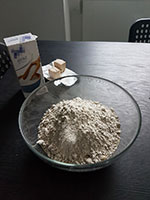
And actually the instructions on what to do are very simple as well... at least in theory...
Just put everything together, knead it very well, let it prove, bake. That's basically it.
 click to enlarge
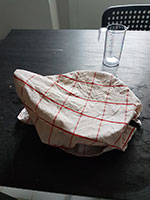
After my first round of kneading my hands were so full of dough that I forgot to take a picture of the kneaded dough...
So here you can see the dough proving for 1 hour. Nicely covered with a wet towel.
The ultra sticky dough was actually my main problem during the whole "experiment".
It was caused by me not sticking to the recipe. When mixing the stuff the dough felt way too dry.
 What I should have done
  more kneading!
 What I did
  adding more water
The worst thing about this: After searching for another recipe on the web I found one which warns you about exactly that mistake. It seems to be a common one among newbies.
Oh and in case you wonder: No, I never made any dough before.
It felt like wasting half of the dough when washing my hands after kneading because so much of it was stuck to them. It was horrible and no fun at all.
 click to enlarge
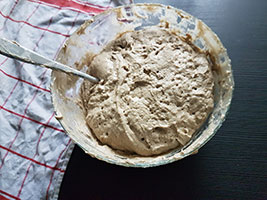
This is the dough after proving. Of course it was still way too wet and I was forced to add more flour to compensate the excess water. I'm not sure how much flour I had to add but it was quite a lot. So in the end I probably had more like 400g-450g of flour instead of the planned 250g.
Without extra flour I would not have been able to knead the dough properly and neither to form the rolls.
By the way: I tried to use the spoon to scrape some dough off my hands and the bowl. It didn't help much.
I wish I had photos of my hands after kneading the sticky dough. They looked absolutely disastrous. At that point I didn't dare to touch my smartphone (which I used for the photos) though.
 click to enlarge
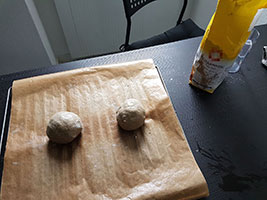
Here are the formed rolls. I only wanted to eat two so I saved the rest of the dough which should easily be enough for two other rolls.
Fun fact: Note the smudges on the flour bag. That's because I somehow had to pour more flour into the bowl with my messed up hands.
Fun fact²: Note the wristwatch. After messing it up with dough as well I decided to take it off for kneading.
After forming the rolls there was another short proving phase.
 click to enlarge
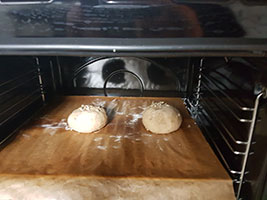
Time to bake! Note that I added some sunflower seeds. Not only on top and bottom but also to the dough itself while kneading.
I didn't watch the clock while baking them at 220°C...
 click to enlarge
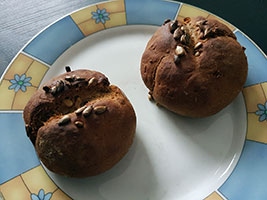
... but they were in the oven for too long.
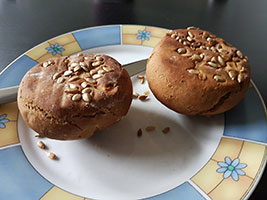
This is the top view after baking...
 click to enlarge
... and this the bottom view. When only looking at the bottom one could think they were bread rolls actually made in a bakery, right?!
I then tried to cut one of them with a regular knife and failed. They were too hard.
This was probably caused by two things:
 Baked for too long
 Added too much flour without adding more yeast - leading to very dense rolls
 click to enlarge
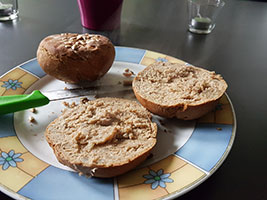
I then took a better knife and finally managed to cut the bread roll. A lot of hot and good smelling steam streamed out of it. It was an amazing moment
As you might see it was indeed quite dense. Also it wasn't salty enough. Again a problem probably caused by the additional flour.
I have to admit that I already ate better bread rolls but these ones were still quite okay for my very first self-made ones!
So what did I learn in the whole process?
 Baking bread (rolls) is quite some work even though the recipe is so simple
 It's crucial to get the flour/water ratio right otherwise kneading will be hell
 When adding (a lot) more flour you should also add more salt & yeast
 It causes backache if you're tall and don't have an extra high working top
How will this new knowledge affect Stranded III?
 Like in Stranded II bread will probably stay a powerful item for nutrition because it is difficult to produce
 Kneading dough will probably take (a short) time unlike in Stranded II where it happened instantly
 Idea: Having a proper kitchen(-table) could give you a bonus on kneading speed and dough/bread quality
Will I do more real life research like this in future?
Maybe but I have no plans yet. I can't (and don't want to!) try everything which is part of a survival situation however.
More Models at Sketchfab
I uploaded some more models to Sketchfab so you can see them in 3D.
I put some work in improving a few of the existing models. I made the palm tree bark texture more beautiful for instance.
Moreover I improved some bushes because the arrangement of the leaves was too boring and made them look too flat.
 Palm Tree @ Sketchfab
 Lifebuoy @ Sketchfab
 Driftwood @ Sketchfab
I also made some new plant variations. For example there are now more "curly" fern versions.
Didn't quite manage to achieve the look I actually wanted to achieve but I like it anyway:
 Curly Fern @ Sketchfab
(Sketchfab seems to have some alpha/z-sorting issues with that model)
And here are some more shrooms:
 Champignon @ Sketchfab
 Amanita Pantherina (Panther Cap) @ Sketchfab
 Amanita Muscaria (Fly Agaric) @ Sketchfab
(yes, both Aminata shrooms use the same model and I basically just re-colored the texture and changed some details. But hey, why not?)
Menus
I mentioned earlier that I want to move all basic menus (like the settings menu) to the C# code base instead of using Lua for them.
This process is nearly done. So not only the UI elements are now C# but also the menus themselves.
Of course you will still be able to create custom menus in Lua and for some menus there will be ways to influence/modify them a bit.
Moreover you will always be able to add additional elements to existing menus and to add sprites and effects.
There also have been some optimizations behind the scenes.
I moved all icons used by the UI to the same sprite atlas for example. This way Unity can batch stuff more efficiently and render the menus even faster.
I also drew some new icons:
 click to enlarge
Research/Excursion: Baking
Even though Stranded III's art style doesn't imply high realism I want to be familiar with the mechanics in the game and how they would work in real life.
I'm sure that this kind of knowledge helps a lot to make better games. For Counter-Strike 2D for instance it helped me to fulfill my military service at the German Bundeswehr. That way I learned first-hand how real weapons actually work and managed to design them way more accurately in the game with details like recoil animations and muzzle smoke as well as bullet casing particles.
Therefore I decided to bake my own bread rolls. And I made pictures to document the process.
 click to enlarge
The ingredients are very simple:
 250g flour (of course I used high quality type 1150 flour!)
  150ml water
 6g salt
 21g yeast
(the recipe I used was everything of this times 2 but it was for 8 rolls and I only wanted to make 4 so I only took half of the original ingredients)
 click to enlarge
And actually the instructions on what to do are very simple as well... at least in theory...
Just put everything together, knead it very well, let it prove, bake. That's basically it.
 click to enlarge
After my first round of kneading my hands were so full of dough that I forgot to take a picture of the kneaded dough...

So here you can see the dough proving for 1 hour. Nicely covered with a wet towel.
The ultra sticky dough was actually my main problem during the whole "experiment".
It was caused by me not sticking to the recipe. When mixing the stuff the dough felt way too dry.
 What I should have done
  more kneading!
 What I did
  adding more water
The worst thing about this: After searching for another recipe on the web I found one which warns you about exactly that mistake. It seems to be a common one among newbies.
Oh and in case you wonder: No, I never made any dough before.
It felt like wasting half of the dough when washing my hands after kneading because so much of it was stuck to them. It was horrible and no fun at all.
 click to enlarge
This is the dough after proving. Of course it was still way too wet and I was forced to add more flour to compensate the excess water. I'm not sure how much flour I had to add but it was quite a lot. So in the end I probably had more like 400g-450g of flour instead of the planned 250g.
Without extra flour I would not have been able to knead the dough properly and neither to form the rolls.
By the way: I tried to use the spoon to scrape some dough off my hands and the bowl. It didn't help much.
I wish I had photos of my hands after kneading the sticky dough. They looked absolutely disastrous. At that point I didn't dare to touch my smartphone (which I used for the photos) though.
 click to enlarge
Here are the formed rolls. I only wanted to eat two so I saved the rest of the dough which should easily be enough for two other rolls.
Fun fact: Note the smudges on the flour bag. That's because I somehow had to pour more flour into the bowl with my messed up hands.
Fun fact²: Note the wristwatch. After messing it up with dough as well I decided to take it off for kneading.
After forming the rolls there was another short proving phase.
 click to enlarge
Time to bake! Note that I added some sunflower seeds. Not only on top and bottom but also to the dough itself while kneading.
I didn't watch the clock while baking them at 220°C...
 click to enlarge
... but they were in the oven for too long.
This is the top view after baking...
 click to enlarge
... and this the bottom view. When only looking at the bottom one could think they were bread rolls actually made in a bakery, right?!
I then tried to cut one of them with a regular knife and failed. They were too hard.
This was probably caused by two things:
 Baked for too long
 Added too much flour without adding more yeast - leading to very dense rolls
 click to enlarge
I then took a better knife and finally managed to cut the bread roll. A lot of hot and good smelling steam streamed out of it. It was an amazing moment

As you might see it was indeed quite dense. Also it wasn't salty enough. Again a problem probably caused by the additional flour.
I have to admit that I already ate better bread rolls but these ones were still quite okay for my very first self-made ones!
So what did I learn in the whole process?
 Baking bread (rolls) is quite some work even though the recipe is so simple
 It's crucial to get the flour/water ratio right otherwise kneading will be hell
 When adding (a lot) more flour you should also add more salt & yeast
 It causes backache if you're tall and don't have an extra high working top
How will this new knowledge affect Stranded III?
 Like in Stranded II bread will probably stay a powerful item for nutrition because it is difficult to produce
 Kneading dough will probably take (a short) time unlike in Stranded II where it happened instantly
 Idea: Having a proper kitchen(-table) could give you a bonus on kneading speed and dough/bread quality
Will I do more real life research like this in future?
Maybe but I have no plans yet. I can't (and don't want to!) try everything which is part of a survival situation however.