Dev Blog
Hi, this is the Stranded III development blog (see also Forum Thread, Comment Thread).
Entry 97 - Neatly Aligned Pottery - November 27, 2020
Immersion: Visible HUD
I played some Stranded Deep recently (only for research of course). What I like most about it is that it looks really good.
It's also nice how they managed to make the game work without any HUD (heads-up display). There is no visible health bar for instance. Instead there's a funny button which makes your player character look at their watch. That watch then displays all relevant values. It also beeps when something important happens.
Having no HUD at all is great for immersion but I think it's not worth it. You have to (or want to) look at the watch so often that the tiny extra step of hitting a button becomes are nuisance quickly.
When working on UI/HUD for Stranded III I asked myself if there should be a visible HUD.
As you can guess from the previous paragraph I decided to have one. It's simply better for game play if you see all relevant values directly without having to do any extra work.
Sure, there are ways around this like special visual effects or sound effects when certain values reach critical levels but I still have the feeling that I really want to see the actual values.
Therefore they will be there. Always. BUT you will be able to change this with a setting. If you want to you can hide them and only show them when a menu is opened or when something important happens.
User Experience
A huge problem I faced while playing Stranded Deep was usability. The inventory is quite minimalistic. It's one of these fancy circle menus which allow you to quickly select stuff with your mouse. Many games use that kind of menu. I guess that's because it's an easy way to present a good number of options and it works well with mouse and controller.
The problem is that - in my opinion - this kind of menu is too limited for an inventory. Especially in a survival game where items are super important and used frequently. You can't have many item slots in it because otherwise it would become too difficult to accurately select items (A circle can't have more than 360° and sections can't be too small).
I think one consequence of this limitation is the annoying stacking behavior in Stranded Deep. You can stack items of the same type but the "state" of the item doesn't matter. In practice that means that - for example - raw, cooked and rotten meat is put into the same slot. You can switch through items in the stack in awkward ways but they all look the same and you have to carefully read what it is. Therefore it happened quite often that I ate raw or rotten meat even though I had freshly cooked meat in my inventory.
In general Stranded Deep does a bad job at explaining how things are controlled. It took me a while to figure out how to drop items which are in the inventory. It's still in early access though so maybe they will improve that.
I noticed that a lot of other games display how stuff is controlled. Permanently and by default. I think this is a simple but still good approach because it's super frustrating to fail only because the controls aren't clear. It's worth to sacrifice some space in the UI if the alternative would be that players quit because they are frustrated.
One good example for that is Grounded which shows key combinations like everywhere.
Therefore I want to display more and better control infos in Stranded III as well and worked on a fancy UI system to make that possible.
It allows to show mouse and keyboard input options with up to two keys (either as alternatives or combinations) per action. It also automatically shows the keys defined in the settings. At least if there is a setting. A few things don't have settings and can't be changed (e.g. Escape for closing stuff).
I can also highlight options if they are the most important ones or make them a bit darker.
Here's an example:
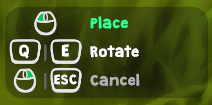
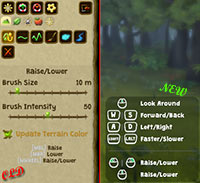
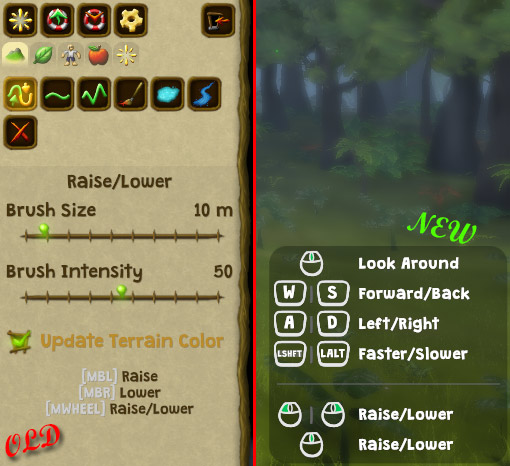
The new system is also used in the editor where it replaces the ugly old plain text instructions:
 Click for bigger version
I also took the opportunity to extend the displayed keys so the users also knows how to move and look around in the editor.
That little info panel has been removed from the left sidebar and now sits in the bottom right corner of the screen.
New Editor Features
I've also worked on the editor!
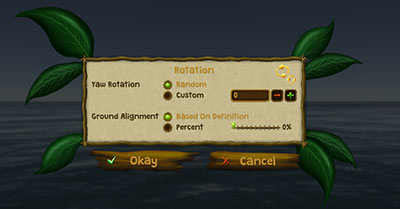
The rotation stuff with ground alignment is something I mentioned earlier. You now have full control over that kind of stuff
Click for bigger version
 Yaw rotation: The rotation (around the Y-axis) when placing objects. By default it's random and changes each time you place an object but you can also define a fixed standard angle.
Ground Alignment: I wrote about that in Dev Blog #94 (Section "Surface Alignment"). Controls how much the object is "tilted" depending on the steepness of the surface.
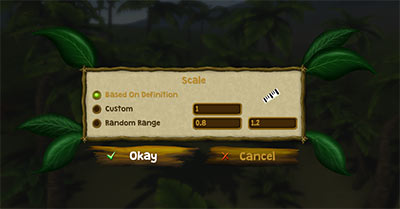
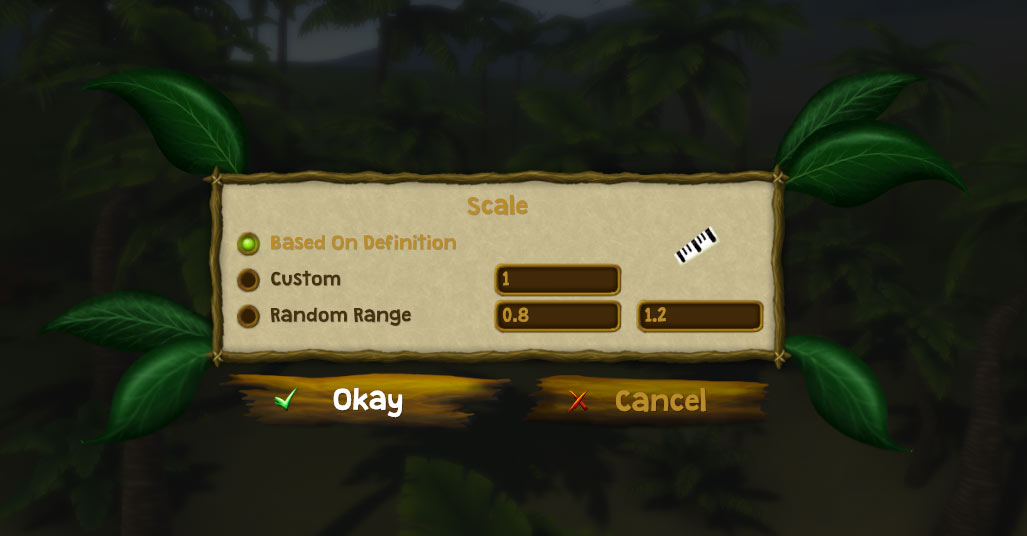
Now there's also new menu which allows you to control the default scale when placing objects:
Click for bigger version
Based on definition: The definition defines the scale. That's the default behavior. The definition can either define just a fixed value or a random range.
Custom: A fixed custom scale factor.
Random Range: A random scale factor between the two given values. Each time an object is placed a new random factor is chosen.
It's important to note that these menus are just used to control the defaults which are used when placing new objects.
Of course you can also freely modify scaling and rotation while and after placing objects.
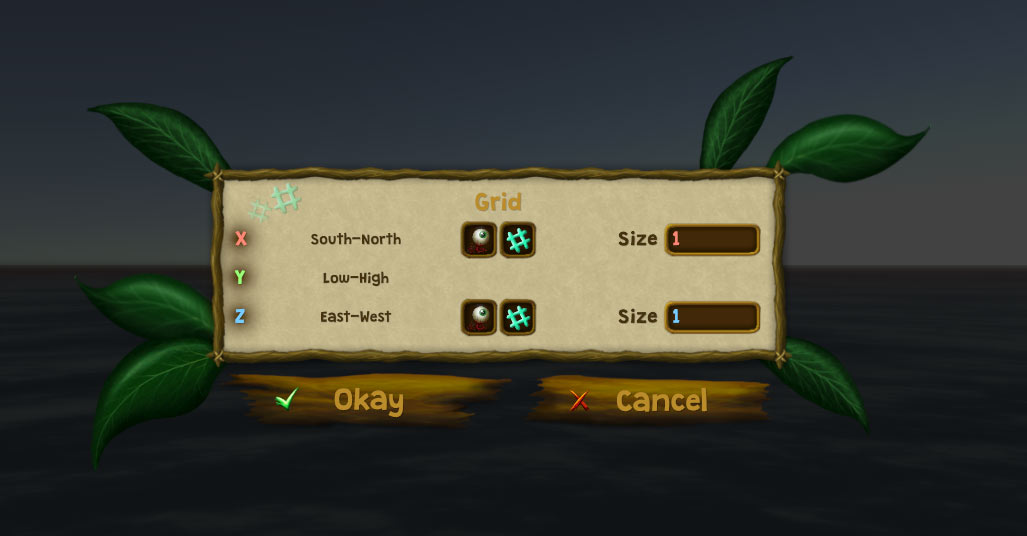
Moreover there's a grid!

Click for bigger version
The grid can be displayed in entity placement mode on X- and/or Z-axis (eye buttons)
You can enabled/disable "snap to grid" for X- and Z-axis separately (# buttons)
You can modify the grid size on X- and Z-axis separately
In the first iteration of that menu I also had a grid for the Y-axis (height) but I decided that this doesn't make much sense since height is commonly defined by the terrain.
That option might come back later depending on how things evolve but right now there is no real use for it.
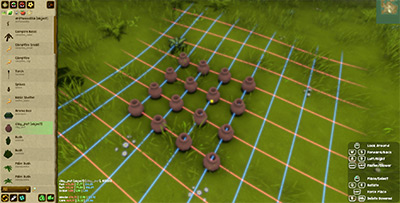
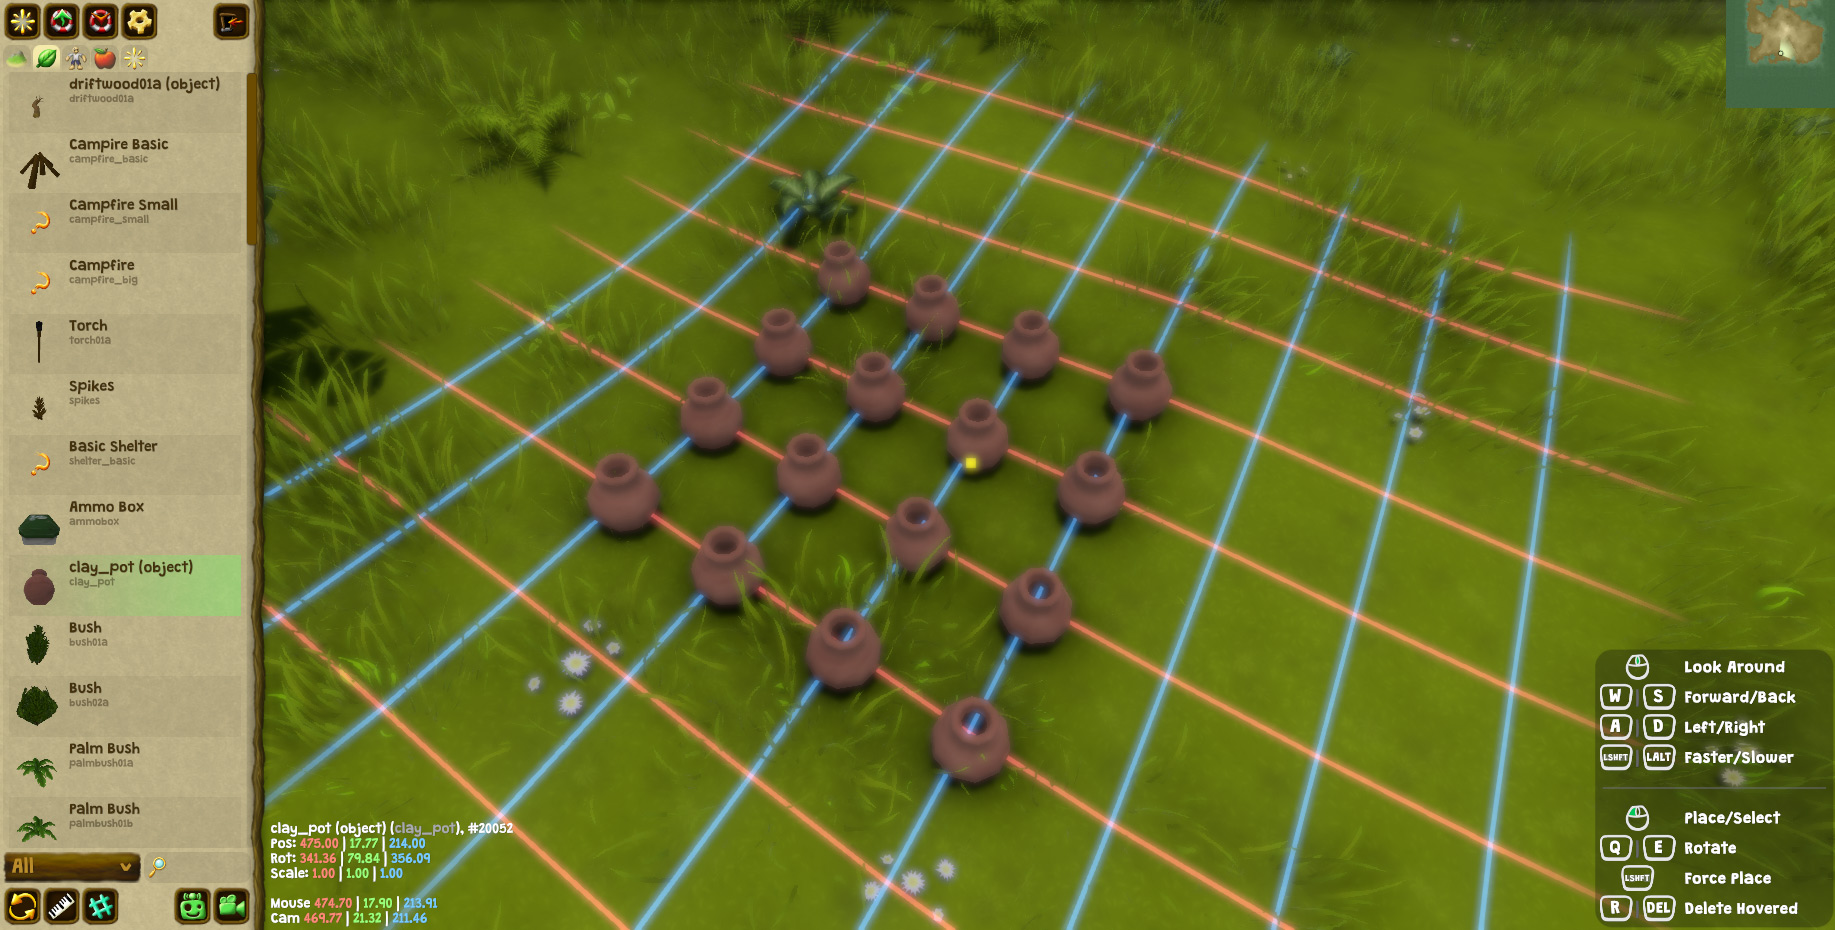
Here's a super realistic, ultra exciting an mind blowing use case scenario for the grid:
Neatly aligned pottery. 4x4. Welcome to OCD heaven*.
Click for bigger version
*) Ooops.. please ignore the little yellow cursor dot which is NOT IN THE CENTER. There is no center in 4x4. At least not with "snap to grid" enabled. Sorry. I didn't want to ruin your day.
I played some Stranded Deep recently (only for research of course). What I like most about it is that it looks really good.
It's also nice how they managed to make the game work without any HUD (heads-up display). There is no visible health bar for instance. Instead there's a funny button which makes your player character look at their watch. That watch then displays all relevant values. It also beeps when something important happens.
Having no HUD at all is great for immersion but I think it's not worth it. You have to (or want to) look at the watch so often that the tiny extra step of hitting a button becomes are nuisance quickly.
When working on UI/HUD for Stranded III I asked myself if there should be a visible HUD.
As you can guess from the previous paragraph I decided to have one. It's simply better for game play if you see all relevant values directly without having to do any extra work.
Sure, there are ways around this like special visual effects or sound effects when certain values reach critical levels but I still have the feeling that I really want to see the actual values.
Therefore they will be there. Always. BUT you will be able to change this with a setting. If you want to you can hide them and only show them when a menu is opened or when something important happens.
User Experience
A huge problem I faced while playing Stranded Deep was usability. The inventory is quite minimalistic. It's one of these fancy circle menus which allow you to quickly select stuff with your mouse. Many games use that kind of menu. I guess that's because it's an easy way to present a good number of options and it works well with mouse and controller.
The problem is that - in my opinion - this kind of menu is too limited for an inventory. Especially in a survival game where items are super important and used frequently. You can't have many item slots in it because otherwise it would become too difficult to accurately select items (A circle can't have more than 360° and sections can't be too small).
I think one consequence of this limitation is the annoying stacking behavior in Stranded Deep. You can stack items of the same type but the "state" of the item doesn't matter. In practice that means that - for example - raw, cooked and rotten meat is put into the same slot. You can switch through items in the stack in awkward ways but they all look the same and you have to carefully read what it is. Therefore it happened quite often that I ate raw or rotten meat even though I had freshly cooked meat in my inventory.
In general Stranded Deep does a bad job at explaining how things are controlled. It took me a while to figure out how to drop items which are in the inventory. It's still in early access though so maybe they will improve that.
I noticed that a lot of other games display how stuff is controlled. Permanently and by default. I think this is a simple but still good approach because it's super frustrating to fail only because the controls aren't clear. It's worth to sacrifice some space in the UI if the alternative would be that players quit because they are frustrated.
One good example for that is Grounded which shows key combinations like everywhere.
Therefore I want to display more and better control infos in Stranded III as well and worked on a fancy UI system to make that possible.
It allows to show mouse and keyboard input options with up to two keys (either as alternatives or combinations) per action. It also automatically shows the keys defined in the settings. At least if there is a setting. A few things don't have settings and can't be changed (e.g. Escape for closing stuff).
I can also highlight options if they are the most important ones or make them a bit darker.
Here's an example:
The new system is also used in the editor where it replaces the ugly old plain text instructions:
 Click for bigger version
I also took the opportunity to extend the displayed keys so the users also knows how to move and look around in the editor.
That little info panel has been removed from the left sidebar and now sits in the bottom right corner of the screen.
New Editor Features
I've also worked on the editor!
The rotation stuff with ground alignment is something I mentioned earlier. You now have full control over that kind of stuff
 Click for bigger version Yaw rotation: The rotation (around the Y-axis) when placing objects. By default it's random and changes each time you place an object but you can also define a fixed standard angle. Ground Alignment: I wrote about that in Dev Blog #94 (Section "Surface Alignment"). Controls how much the object is "tilted" depending on the steepness of the surface.
Now there's also new menu which allows you to control the default scale when placing objects:
 Click for bigger version Based on definition: The definition defines the scale. That's the default behavior. The definition can either define just a fixed value or a random range. Custom: A fixed custom scale factor. Random Range: A random scale factor between the two given values. Each time an object is placed a new random factor is chosen.
It's important to note that these menus are just used to control the defaults which are used when placing new objects.
Of course you can also freely modify scaling and rotation while and after placing objects.
Moreover there's a grid!
 Click for bigger version The grid can be displayed in entity placement mode on X- and/or Z-axis (eye buttons) You can enabled/disable "snap to grid" for X- and Z-axis separately (# buttons) You can modify the grid size on X- and Z-axis separately
In the first iteration of that menu I also had a grid for the Y-axis (height) but I decided that this doesn't make much sense since height is commonly defined by the terrain.
That option might come back later depending on how things evolve but right now there is no real use for it.
Here's a super realistic, ultra exciting an mind blowing use case scenario for the grid:
Neatly aligned pottery. 4x4. Welcome to OCD heaven*.
 Click for bigger version
*) Ooops.. please ignore the little yellow cursor dot which is NOT IN THE CENTER. There is no center in 4x4. At least not with "snap to grid" enabled. Sorry. I didn't want to ruin your day.