Dev Blog
Hi, this is the Stranded III development blog (see also Forum Thread, Comment Thread).
Entry 95 - Stuff In Hands - October 11, 2020
Stuff In Hands
Stranded II didn't have it, Stranded III will have it: Visible equipment in your hands.
Doing something supposedly simple like this in a first person 3D game comes with some technical problems.
Let's assume the player is wielding a hammer.
Of course we want to see that in first person!
The naive approach would be to attach the hammer to the first person view camera.
That way it will move and rotate with the camera. Exactly what we need. It's stuck directly inside the camera though which doesn't look very nice. Therefore we add a small forward offset (in view direction).
Voila! That works! Add some fancy animations and we're done! Right?
Nope
Yes, it does work and all looks fine but as soon as you move close to another object you'll see that parts of your hammer disappear within that object.
That just looks wrong and doesn't make sense.
The problem happens because I do not have any extra colliders on the hammer. It's a purely visual element and it has to be like that. Otherwise you could get stuck while rotating the player which would be really horrible.
Luckily there are many ways to fix this issue:
 A second camera which only renders your hammer and which is rendered after the normal game scene
A special shader which tells the engine to render your hammer after everything else (ignoring the z-buffer which is typically used to define render order).
Make the collider of the player/other objects so big, that the player can't get too close to other objects
Render the hammer into a render texture and show that as UI (or display it on a plane)
Make the hammer tiny and move it very close to the camera
I tried the second camera approach but I didn't manage to make it work with Unity 2019 and the v2 post processing stack.
Rendering a second camera with a transparent background is probably nothing the Unity devs thought about when implementing the post processing - or I was just too stupid to find the right way to fix it.
It worked without post processing effects but I already put quite some time into the post processing stuff and I don't want to remove it. Therefore I discarded that solution.
The special shader is not an option either because it would be annoying and/or limiting. Having to make an extra shader for each shader used in equipment items is not cool.
Same for the collider workaround.
I'm pretty sure that the render texture approach would have worked but it's not a nice solution.
Especially because it would require an additional huge texture in memory and an additional render pass. Therefore I didn't even try to do it that way.
Instead I chose the last option. I made the tool tiny and moved it closer to the camera.
This solution is cheap (no additional texture, no additional render pass) and also very easy to implement.
Just divide the hammer size by X units and at the same time move the object X units closer to the camera. There is no visible difference.
The only thing I had to take care of was the near clipping plane of the camera which cuts off stuff which is very close to the camera. Luckily Unity allows to adjust the distance of that plane.

That's the result. Do you see that the hammer is actually tiny?! I hope you don't!
Note however that this solution isn't 100% perfect. If you're really close to something with stupid geometry/colliders (or no colliders at all like foliage) the wielded item may still intersect. I think it's good enough anyway.
Building Menu Images
I have drawn some icons for building categories. This is nothing special and I worked on a lot of other things as well but sometimes it's not easy to find stuff which can easily be shown/explained in the dev blog.
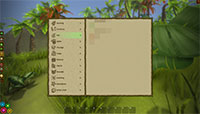
Oh.. and of course you can't build plants or animals. Don't get that wrong!
You can however build stuff FOR plants or animals. E.g. a herb garden or a stable.
Starting Equipment
When you play a custom game you will also be able to choose custom starting equipment! At least in some game modes.
To make that possible I extended the entity list dialog (mentioned in the previous blog entry) and added an option to also enter amount values in little textboxes right in the list. How convenient!
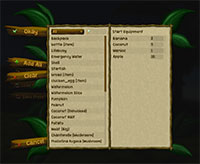
After implementing this I noticed that you easily missclick and remove the entry directly instead of focusing the text input field which is very annoying.
Therefore you now have to confirm removal in a little context menu.
Stranded II didn't have it, Stranded III will have it: Visible equipment in your hands.
Doing something supposedly simple like this in a first person 3D game comes with some technical problems.
Let's assume the player is wielding a hammer.
Of course we want to see that in first person!
The naive approach would be to attach the hammer to the first person view camera.
That way it will move and rotate with the camera. Exactly what we need. It's stuck directly inside the camera though which doesn't look very nice. Therefore we add a small forward offset (in view direction).
Voila! That works! Add some fancy animations and we're done! Right?
Nope
Yes, it does work and all looks fine but as soon as you move close to another object you'll see that parts of your hammer disappear within that object.
That just looks wrong and doesn't make sense.
The problem happens because I do not have any extra colliders on the hammer. It's a purely visual element and it has to be like that. Otherwise you could get stuck while rotating the player which would be really horrible.
Luckily there are many ways to fix this issue:
A second camera which only renders your hammer and which is rendered after the normal game scene A special shader which tells the engine to render your hammer after everything else (ignoring the z-buffer which is typically used to define render order). Make the collider of the player/other objects so big, that the player can't get too close to other objects Render the hammer into a render texture and show that as UI (or display it on a plane) Make the hammer tiny and move it very close to the cameraI tried the second camera approach but I didn't manage to make it work with Unity 2019 and the v2 post processing stack.
Rendering a second camera with a transparent background is probably nothing the Unity devs thought about when implementing the post processing - or I was just too stupid to find the right way to fix it.
It worked without post processing effects but I already put quite some time into the post processing stuff and I don't want to remove it. Therefore I discarded that solution.
The special shader is not an option either because it would be annoying and/or limiting. Having to make an extra shader for each shader used in equipment items is not cool.
Same for the collider workaround.
I'm pretty sure that the render texture approach would have worked but it's not a nice solution.
Especially because it would require an additional huge texture in memory and an additional render pass. Therefore I didn't even try to do it that way.
Instead I chose the last option. I made the tool tiny and moved it closer to the camera.
This solution is cheap (no additional texture, no additional render pass) and also very easy to implement.
Just divide the hammer size by X units and at the same time move the object X units closer to the camera. There is no visible difference.
The only thing I had to take care of was the near clipping plane of the camera which cuts off stuff which is very close to the camera. Luckily Unity allows to adjust the distance of that plane.
That's the result. Do you see that the hammer is actually tiny?! I hope you don't!
Note however that this solution isn't 100% perfect. If you're really close to something with stupid geometry/colliders (or no colliders at all like foliage) the wielded item may still intersect. I think it's good enough anyway.
Building Menu Images
I have drawn some icons for building categories. This is nothing special and I worked on a lot of other things as well but sometimes it's not easy to find stuff which can easily be shown/explained in the dev blog.
Oh.. and of course you can't build plants or animals. Don't get that wrong!
You can however build stuff FOR plants or animals. E.g. a herb garden or a stable.
Starting Equipment
When you play a custom game you will also be able to choose custom starting equipment! At least in some game modes.
To make that possible I extended the entity list dialog (mentioned in the previous blog entry) and added an option to also enter amount values in little textboxes right in the list. How convenient!
After implementing this I noticed that you easily missclick and remove the entry directly instead of focusing the text input field which is very annoying.
Therefore you now have to confirm removal in a little context menu.