Dev Blog
Hi, this is the Stranded III development blog (see also Forum Thread, Comment Thread).
Entry 52 - Context Menu & Interface Meshes - July 24, 2016
Context Menu Improvements
My context menus now support header-items (the thing containing the question):

 click to enlarge
This allows some fancy quick context menus for confirmation situations like in the one pictured in the screenshot above. The benefit compared to a full confirmation dialog is that context menus are quicker to use because they spawn right next to the clicked thing.
Also they are super easy to implement with my Stranded III Lua UI system
Here's the whole code for the delete save game button which actually contains the context menu code as well:
It's using multiple anonymous functions to implement the logic. The first one (starting in line 2) is the function which is executed when the button is clicked. This function basically creates the context menu which is defined with a big table (lines 5-15). That table contains a second anonymous function which is executed when "Yes" is clicked (lines 9-10).
3D meshes in the user interface
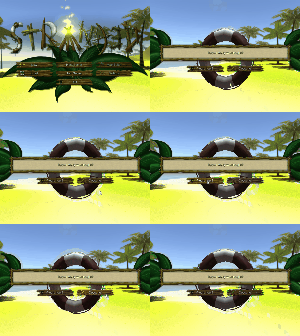
The Lua API has been extended to support drawing of 3D meshes in the user interface! Here's an example:

 click to enlarge (6 mb)
The code to draw this animated 3D lifebuoy is:
s3mesh.drawInterface expects a definition to something which contains a 3D mesh, and 3 Vector3 tables: position, rotation and scale. Very basic sine and cosine operations are used to make the lifebuoy move a bit. menu.deco.leafScaleIn is a variable from the leaf animation system. I simply re-used it. It's for the very quick scale-in effect when the menu is opened.
My context menus now support header-items (the thing containing the question):
 click to enlarge
This allows some fancy quick context menus for confirmation situations like in the one pictured in the screenshot above. The benefit compared to a full confirmation dialog is that context menus are quicker to use because they spawn right next to the clicked thing.
Also they are super easy to implement with my Stranded III Lua UI system

Here's the whole code for the delete save game button which actually contains the context menu code as well:
1
2
3
4
5
6
7
8
9
10
11
12
13
14
15
16
17
2
3
4
5
6
7
8
9
10
11
12
13
14
15
16
17
self.deleteButton = gui.button.createMain("delete", 0, 0, false, true,
function()
local name = self.list:getSelectedText()
-- Confirm delete
gui.context.menu.createAutoFit({
{label = "Delete '" .. name .. "'?", header = true},
{icon = menu.gfx.icon_okay, label = "yes",
-- Actually delete save game
click = function()
s3savegame.delete(name)
self:updateSaveGameList()
end
},
{icon = menu.gfx.icon_cancel, label = "no"}
})
end,
nil, menu.gfx.icon_cancel)
It's using multiple anonymous functions to implement the logic. The first one (starting in line 2) is the function which is executed when the button is clicked. This function basically creates the context menu which is defined with a big table (lines 5-15). That table contains a second anonymous function which is executed when "Yes" is clicked (lines 9-10).
3D meshes in the user interface
The Lua API has been extended to support drawing of 3D meshes in the user interface! Here's an example:
 click to enlarge (6 mb)
The code to draw this animated 3D lifebuoy is:
1
2
3
4
5
6
7
8
2
3
4
5
6
7
8
update = function(self)
-- Draw fancy lifebuoy 3D mesh
local t = gui.ms / 1000
local yPos = math.sin(t) * 0.1
local yRot = math.cos(t / 1.3) * 30
local scale = math.min(350, (350 * menu.deco.leafScaleIn) * 3)
s3mesh.drawInterface("lifebuoy", {0, yPos, 10}, {90, yRot, 0}, {scale, scale, scale})
end
-- Draw fancy lifebuoy 3D mesh
local t = gui.ms / 1000
local yPos = math.sin(t) * 0.1
local yRot = math.cos(t / 1.3) * 30
local scale = math.min(350, (350 * menu.deco.leafScaleIn) * 3)
s3mesh.drawInterface("lifebuoy", {0, yPos, 10}, {90, yRot, 0}, {scale, scale, scale})
end
s3mesh.drawInterface expects a definition to something which contains a 3D mesh, and 3 Vector3 tables: position, rotation and scale. Very basic sine and cosine operations are used to make the lifebuoy move a bit. menu.deco.leafScaleIn is a variable from the leaf animation system. I simply re-used it. It's for the very quick scale-in effect when the menu is opened.